Hello there! This post will, Lord willing, be the start of different tutorials and sewing tips here on The Quilting Rose blog. I hope you will enjoy following along, and if you have any suggestions for future posts just comment and let me know!
My brother's quilt that my mom and I made for him several years ago had seen its last days, so he asked me to make him another one. I searched for a pattern I thought he would like, bought the fabric, and began making it. It was the perfect opportunity to do a quilt tutorial, so I grabbed a phone and photographed the process!
The pattern is called Jacob's Ladder.
Quilt size: Twin- 63"x 90"
Block size: 9"
7 blocks x 10 blocks
I used 4 different fabrics:
White: 3 yds.
Dark Blue: 2-1/2 yds.
Maroon: 7/8 yd.
Black: 1/2 yd.
The fabric requirements are based on 44"-45" fabric width.
Backing: 2 yds. of wide (108") fabric
Batting: Twin Size (I use Hobbs Heirloom Premium Cotton Quilt Batting)
The first thing is to iron all the fabric. Some people wash and dry their fabric before using it, but I've never done that and I haven't had any problems. :)
Now it's time to get started! A few tools that make the cutting process go quicker are a rotary cutter/mat and a Omnigrid ruler. I especially love the Omnigrid rulers... those things are wonderful! When I first started making quilts all I used was a yardstick, pen, and scissors. :D But then I finally upgraded, and it is amazing how much easier the cutting process is now.
The cutting instructions.
1. Sew all of the 2" strips together.
-7 Black/Blue
-14 Red/White
-14 Blue/White
To save time sewing the strips together, you can use a simple technique called chain piecing, which is where you keep sewing the strips in one continuous line without lifting the pressure foot or cutting the thread. When you come to the end of one strip sew a few stitches off the fabric, and then slid the next strip under the foot and began sewing. This saves a lot of time and thread!
2. Press the seam to one side.
3. Cut strips into 2" rectangles.
-140 Black/Blue
-280 Red/White
-280 Blue/White
4. Sew with right sides together and make sure to alternate the different color squares.
5. Press
6. Cut 140 (3-3/8") squares each from both of the blue and white strips.
7. Draw a line down the middle of all the squares of one color.
8. Take a blue and white square and with right sides together, sew 1/4" from each side of the line.
9. Cut down the middle.
You now have two 3-1/2" half triangle squares.
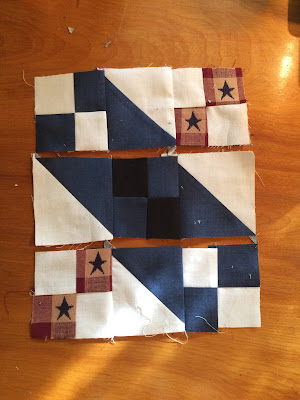
10. Lay the blocks out in this order and sew together to make one 9" block.
11. Join 7 blocks in a row, making 10 rows.
Rotate every other block 90 degrees, as shown in above picture.Well, you've just finished your quilt top! Come back for Part 2 to learn how to finish it out with quilting and binding.
Happy sewing!
-The Quilting Rose


Hi Quilting Rose!! This is SUCH a good, well-photographed tutorial!! And what a lovely quilt! I was so excited about this post. Keep up the great work!!
ReplyDelete~Martha Joy